Understanding the Tevo Tarantula X Carriage
The Tevo Tarantula X is a popular 3D printer known for its affordability and ease of use. A critical component of the printer is the carriage, which is the part that holds the hotend, extruder, and other essential printing components. Understanding the carriage and its function is crucial for anyone looking to upgrade or maintain their Tevo Tarantula X. This guide will provide you with all the necessary information to successfully upgrade your carriage and improve your 3D printing experience. Proper maintenance and upgrades can significantly extend the life of your printer and improve the quality of your prints, making it a worthwhile investment of your time and effort. Let’s begin by defining what the carriage is and its role in the printing process.
What is the Carriage
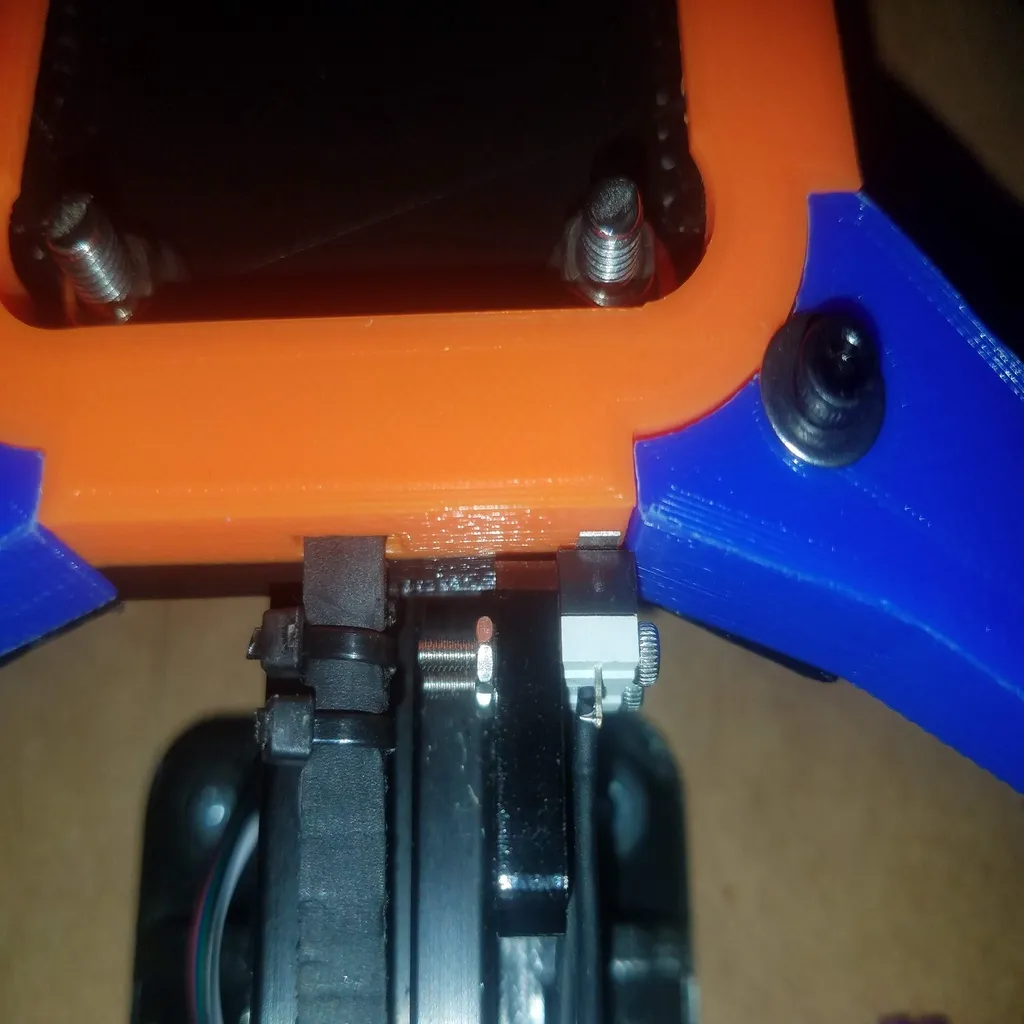
The carriage on the Tevo Tarantula X, sometimes referred to as the X-carriage, is the assembly that moves horizontally along the X-axis. It is the part that the hotend, which melts and extrudes the filament, and the extruder, which feeds the filament, are mounted on. The carriage is driven by a belt and stepper motor, allowing for precise movement and control during the printing process. The design of the carriage directly impacts print quality, speed, and overall printer performance. Understanding its components is fundamental to any upgrade or maintenance procedure.
Components of the Tevo Tarantula X Carriage

The Tevo Tarantula X carriage comprises several key components that work in unison to facilitate the printing process. These include the carriage plate itself, usually made of aluminum or another sturdy material, which provides the structural foundation. Attached to the plate are the hotend, extruder, X-axis bearings, belt, and various mounting hardware. The hotend melts the filament and deposits it onto the print bed, while the extruder pushes the filament through the hotend. X-axis bearings allow for smooth and precise horizontal movement, and the belt connects to a stepper motor to control the carriage’s motion. Understanding each of these components is crucial when considering upgrades or troubleshooting any issues. Reviewing these components will improve your understanding of how to improve your 3D printing experience.
Why Upgrade Your Tevo Tarantula X Carriage
Upgrading your Tevo Tarantula X carriage can significantly improve your 3D printing experience. While the stock carriage is functional, it can be improved for better performance, reliability, and print quality. Upgrades can address common issues and introduce new capabilities to your printer. Investing in upgrades can be a cost-effective way to enhance your printing results without the need to purchase an entirely new 3D printer. The following section will discuss the various benefits associated with these upgrades, and why you should consider them.
Benefits of Upgrading the Carriage
Upgrading the carriage on your Tevo Tarantula X offers several key advantages. You can expect improved print quality due to enhanced stability and precision, which can lead to finer details and smoother surfaces on your prints. Upgraded carriages often feature better bearing systems, which reduces friction and wear, extending the life of your printer. Furthermore, upgrades can allow for faster printing speeds, resulting in increased efficiency. A more rigid carriage can also minimize vibrations, leading to reduced ringing and other print artifacts. Overall, upgrading the carriage is a worthwhile investment for achieving higher-quality prints, increasing print speed, and minimizing printer downtime. Consider the improvements for your prints and decide if they can benefit your business.
Common Issues Resolved by Upgrades

Upgrading your Tevo Tarantula X carriage directly addresses several common issues that can plague 3D printing. One significant problem is the lack of rigidity in the stock carriage, which can cause vibrations and reduce print quality, especially at higher speeds. Upgraded carriages often use more robust materials and designs to mitigate these issues. Another common problem is bearing wear, which can lead to uneven movement and print defects. Upgrading to higher-quality bearings can resolve this issue. Finally, upgrades may improve the overall stability of the hotend, resulting in more consistent extrusion and better print adhesion. By addressing these common problems, an upgraded carriage ensures more reliable and higher-quality prints. Analyze your existing print problems and identify how a carriage upgrade may help solve them.
Essential Tools and Materials
Before starting your Tevo Tarantula X carriage upgrade, it’s important to gather all the necessary tools and materials. Having everything prepared in advance will streamline the process and prevent interruptions. A well-equipped workspace will make the entire procedure safer and more efficient. Make sure you have all the required tools and parts. Careful preparation is key to a successful upgrade. The following sections list the required tools and materials to get you started.
Tools Required for Carriage Upgrades
The tools you will need for a Tevo Tarantula X carriage upgrade are relatively common, but essential for a successful upgrade. You will need a set of Allen wrenches or hex keys in various sizes to remove and install screws. A screwdriver set with both flathead and Phillips head options is also essential. A pair of pliers, preferably needle-nose, can be helpful for handling small parts and wires. You might also need a small adjustable wrench for certain components. A set of calipers for accurate measurements is highly recommended, and a sharp hobby knife for trimming and cutting materials is also valuable. Finally, a clean workspace, good lighting, and a non-abrasive surface to work on are crucial.
Materials Needed for Carriage Upgrades

The materials required for your Tevo Tarantula X carriage upgrade will vary depending on the specific upgrade you choose. You will likely need a new carriage plate, possibly made of aluminum or another rigid material. High-quality bearings, such as linear bearings or ball bearings, can significantly improve print quality and reduce wear. Replacement screws, nuts, and bolts may be required, especially if you’re replacing the entire carriage assembly. You might also need thermal paste to improve heat transfer between the hotend and the heatsink. Filament, for test prints and calibration, should also be available. Make sure you verify all the required components before you begin. Consider the materials needed for the planned upgrades before purchasing.
Step-by-Step Tevo Tarantula X Carriage Upgrade Guide
Once you’ve gathered your tools and materials, you can start the carriage upgrade process. It’s crucial to follow each step carefully to ensure a successful upgrade and prevent any damage to your printer. Take your time, and don’t hesitate to consult online resources or videos if you get stuck. Proper execution of each step will minimize errors and help produce higher-quality prints. The following steps provide a detailed guide on disassembling the old carriage, installing the new one, and calibrating the printer for optimal performance.
Disassembly of the Existing Carriage
The first step in the upgrade process is to disassemble the existing carriage on your Tevo Tarantula X. Start by disconnecting the power and any cables connected to the hotend and extruder. Carefully remove the hotend and extruder assembly from the carriage, taking note of how everything is connected. Next, remove the X-axis belt, which is often held in place with screws or clips. Finally, carefully remove the X-axis bearings from the carriage. Be sure to keep all screws and parts organized, preferably in a container or tray, to avoid losing them. Following these steps in the correct order will ensure a smooth disassembly process.
Removing the Hotend and Extruder

Carefully detach the hotend and extruder from the carriage. Start by disconnecting the wires to the hotend heater cartridge and thermistor. Remove any screws or fasteners that secure the hotend and extruder to the carriage. Take note of the orientation of the hotend and extruder and the way they are mounted. Carefully detach the extruder from the carriage, being mindful of the filament path and any associated components. Ensure you handle the hotend and extruder with care, as they are essential for the printing process. Following these steps prevents damage and prepares the carriage for upgrade.
Removing the X-Axis Bearings and Belt
After detaching the hotend and extruder, remove the X-axis bearings and belt. Locate the screws or fasteners that secure the X-axis bearings to the carriage. Carefully remove these screws and detach the bearings from the carriage. Then, loosen the belt tensioning mechanism, and gently remove the belt from the carriage. Pay attention to the path of the belt and how it connects to the stepper motor. Organize all removed parts to avoid loss. Carefully removing these components is critical for successful carriage replacement. This prepares the frame for the new carriage installation.
Installing the New Carriage
With the old carriage disassembled, you can begin installing the new one. Carefully attach the new carriage plate to the X-axis frame. Ensure all screws are properly tightened, but not over-tightened. Reinstall the X-axis bearings onto the new carriage, ensuring they are correctly oriented and secured. Properly install the X-axis belt, adjusting the tension to the manufacturer’s specifications. Once the new carriage is securely in place, you can proceed to reattaching the hotend and extruder.
Attaching the Hotend and Extruder

Carefully reattach the hotend and extruder to the new carriage. Ensure that they are mounted securely and correctly aligned with the print bed. Reconnect the hotend heater cartridge and thermistor wires. Check that the filament path is clear and that the extruder is properly aligned to feed the filament into the hotend. Double-check all connections to ensure they are secure and that no wires are pinched or damaged. Proper attachment of the hotend and extruder is crucial for the 3D printing process.
Installing X-Axis Bearings and Belt
Once you have the hotend and extruder in place, you need to ensure that the X-axis bearings and belt are reinstalled correctly. The bearings should be mounted in the correct orientation on the new carriage. The belt should be threaded through the carriage and connected to the stepper motor. Adjust the belt tension to the correct level, typically specified by the printer manufacturer. Make sure the belt is aligned properly and that it moves smoothly. Carefully check for any obstructions that could interfere with the carriage’s movement. The bearings and belt play a crucial role in print quality and printer performance.
Calibrating and Testing the Upgraded Carriage
After installing the new carriage, the next step is to calibrate and test it to ensure it functions correctly. Proper calibration will ensure that your prints are accurate and of high quality. You should perform several checks and adjustments to achieve the best results. This section will guide you through the crucial steps for calibrating and testing the upgraded carriage.
Bed Leveling and Z-Offset Adjustment

Bed leveling and Z-offset adjustment are critical for achieving good first-layer adhesion and overall print quality. First, level the print bed manually or using the printer’s auto-leveling feature, if available. Then, adjust the Z-offset, which determines the distance between the nozzle and the print bed. This distance should be adjusted so that the first layer of filament adheres properly to the bed without being too squished. You may need to perform several test prints to fine-tune the bed level and Z-offset settings. Proper bed leveling and Z-offset settings are essential for successful printing. The perfect level guarantees good adhesion and print quality.
Test Prints and Fine-Tuning
Once the bed is leveled and the Z-offset is adjusted, it’s time to perform test prints and fine-tune the settings. Start with a simple test print, such as a calibration cube or a small geometric object. Monitor the first layer adhesion and the overall print quality. If there are any issues, such as poor adhesion, warping, or uneven layers, adjust the settings accordingly. Fine-tune your settings, such as the nozzle temperature, bed temperature, and print speed, to optimize print quality. Repeat the test prints as needed, until you achieve satisfactory results. Remember that patience is key. Proper adjustment guarantees optimal print quality and overall performance.
Troubleshooting Common Issues
Even with a successful upgrade, you may encounter some common issues. Understanding these potential problems and how to troubleshoot them will help you keep your 3D printer running smoothly. The following section will help address common issues that arise in 3D printing and guide you through the troubleshooting process. Being prepared can save you time and avoid frustration, and will help ensure the printing process continues.
Print Quality Problems

Several print quality problems can arise after an upgrade. Issues such as poor layer adhesion, warping, or stringing are common. Poor layer adhesion might be caused by incorrect bed leveling, nozzle temperature, or printing speed. Warping can result from insufficient bed adhesion or the wrong bed temperature. Stringing can occur if the retraction settings are not properly configured. To solve these problems, fine-tune your printer settings. Print quality problems can negatively affect the final result of your prints, so always take your time to review them. Addressing issues such as adhesion, warping and stringing with the right settings can yield the best results.
Mechanical Issues
Mechanical issues can also appear after an upgrade. The carriage might be moving unevenly, or the X-axis belt might be slipping. Uneven carriage movement may be caused by improperly installed bearings or a misaligned carriage. Slipping of the X-axis belt can result from incorrect tension or worn components. To solve these issues, inspect the bearing and belt for any wear and tear. Ensure that all screws are tightened properly and that the carriage moves smoothly. Proper maintenance can extend the life of your printer. Performing routine maintenance and checks will extend the printer’s lifespan.
Maintenance and Future Upgrades
Regular maintenance and considering future upgrades are crucial to keeping your Tevo Tarantula X 3D printer in excellent condition. Proper maintenance will extend the life of your printer and ensure consistently high-quality prints. The following section will help you create a proper maintenance schedule and consider potential future upgrades that may improve your 3D printing experience.
Regular Maintenance Tips
To keep your 3D printer in optimal condition, follow these regular maintenance tips. Regularly lubricate the bearings and moving parts of the carriage to reduce friction and wear. Check and tighten all screws and fasteners to prevent vibrations and ensure stability. Clean the nozzle and hotend regularly to prevent clogs and ensure smooth filament extrusion. Inspect the X-axis belt for wear and tear, and replace it when needed. Regular maintenance will help prevent major issues and keep your printer running smoothly for years to come. Always make sure to check all the components and parts for any potential damage.
Potential Future Upgrades
Once you have upgraded your Tevo Tarantula X carriage, you can consider other potential upgrades. Upgrading the extruder to a direct-drive system can improve filament control and print quality. Replacing the hotend with a higher-quality unit can improve temperature control and printing performance. Adding a heated bed can expand the range of materials you can print with. Upgrading the mainboard can improve printer control and add new features. Continuously upgrading your printer is a great way to improve the performance. Consider these suggestions and identify any additional improvements you can make.