Understanding the Tevo Tarantula Laser Engraver
The Tevo Tarantula is a popular 3D printer that can also be adapted for laser engraving. This guide will help you get started with the laser engraving function, transforming your 3D printer into a versatile tool for creating intricate designs on various materials. This process involves replacing the printer’s extruder with a laser module, allowing you to burn designs onto surfaces instead of extruding plastic. Laser engraving with the Tevo Tarantula offers a cost-effective way to explore this exciting technology.
What is the Tevo Tarantula Engraver
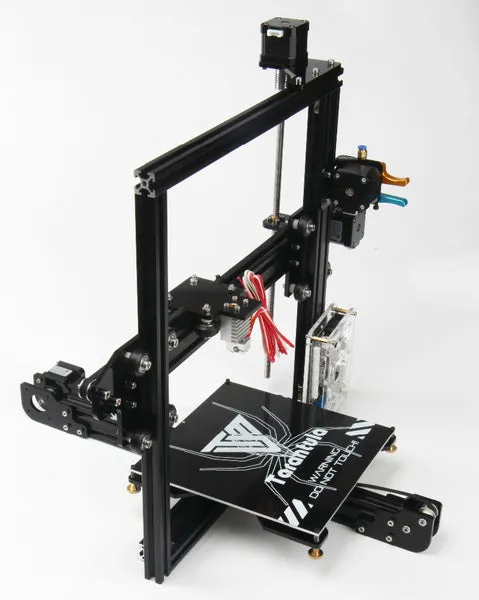
The Tevo Tarantula Engraver, in essence, is the Tevo Tarantula 3D printer modified with a laser diode. This modification allows the machine to use focused laser beams to remove material from a surface. The laser is controlled by the printer’s existing electronics, but it necessitates the installation of a laser module. This setup is great for hobbyists and DIY enthusiasts wanting to personalize items, create custom art, or prototype designs using materials such as wood, acrylic, and even some metals. Understanding this setup is vital to ensure its effective and safe use.
Key Features and Specifications

The Tevo Tarantula’s features are greatly enhanced by the laser engraving upgrade. It is important to consider the specifications of the laser module when choosing one for your setup. Key specifications include the laser power output (measured in milliwatts or watts), the wavelength, and the effective engraving area. The engraving area is typically the same as the 3D printer’s build volume. Ensure the laser module is compatible with the Tarantula’s electronics, which can usually be done with a little research. The laser’s power dictates the materials that can be engraved and the speed at which engraving is possible. Safety features, such as an enclosure and safety glasses, are also crucial.
Tools and Materials You’ll Need
Before you begin, gather all the necessary tools and materials. This ensures a smooth and efficient setup. You will need the Tevo Tarantula 3D printer, a laser engraving module (usually available as an add-on), safety glasses, and a computer to control the engraving process. Other essential items include the materials you plan to engrave, such as wood, acrylic, or cardstock. A power supply, if not included with the laser module, will also be necessary. Lastly, have a well-ventilated workspace to prevent the inhalation of fumes generated during the engraving process.
Essential Safety Gear
Safety must be your utmost priority when operating a laser engraver. Safety glasses designed for the specific wavelength of your laser module are non-negotiable. These glasses protect your eyes from the focused laser beam, which can cause severe eye damage. Always wear these glasses when the laser is on, even if the machine has an enclosure. Consider also using an enclosure around the laser engraver to contain the laser beam and fumes. A fire extinguisher should be on hand, especially when engraving flammable materials. Proper ventilation will also prevent the buildup of harmful fumes.
Materials to Engrave

The Tevo Tarantula laser engraver is capable of engraving a wide array of materials. However, the specific materials and the quality of the engraving will depend on the laser’s power and settings. Popular materials include wood (various types, such as plywood, basswood, and balsa), acrylic, cardstock, leather, and some types of plastics. Certain metals can also be engraved, but this usually requires a more powerful laser and specific techniques like using a marking agent. Start with softer, less dense materials for your initial projects to gain experience before moving on to harder materials. Always experiment on test pieces before working on your final project.
Software and Firmware Setup
Setting up the software and firmware is crucial for controlling your laser engraver. You will need to select software that is compatible with your laser module and Tevo Tarantula’s electronics. This software will allow you to upload your designs, adjust settings like power and speed, and control the laser’s movements. Familiarize yourself with the software’s interface and features, especially those related to laser engraving. Firmware updates may also be necessary for the control board of your 3D printer. Ensure that you have the latest firmware installed, as it can significantly affect the performance and compatibility of your laser engraving setup.
Downloading and Installing Software
Choose a software package that is compatible with your laser module and operating system. Some popular choices include LaserGRBL (free and open-source), LightBurn (paid), and other software that is compatible with the Marlin firmware on the Tevo Tarantula. Download the software from a trusted source, such as the developer’s website. Once downloaded, follow the installation instructions. During installation, you may need to install drivers for your laser module. After installation, open the software and make sure it recognizes your laser engraver.
Firmware Configuration and Updates
The firmware is the software that controls the hardware of your Tevo Tarantula and it might require some modification for laser engraving. Before starting, ensure you have the latest firmware. If required, download it from the manufacturer’s website. Consult the documentation for your laser module to understand the specific firmware changes required. The settings often need to be tweaked to enable laser control (e.g., PWM control for power adjustment). Connect the printer to your computer and use the appropriate software to flash the new firmware onto the control board. Be cautious and follow the steps precisely to avoid corrupting the firmware.
Setting Up Your Engraver
Setting up the physical aspects of your laser engraver is a straightforward process. This involves assembling the laser module onto your Tevo Tarantula 3D printer, connecting it to the control board, and then preparing the work area. This is where your 3D printer transforms into a laser engraver. Before starting, consult the instructions that come with your laser module and Tevo Tarantula. Keep in mind safety precautions and the necessary calibration to get the most out of your setup. Ensure the work area is properly set up for the size and material you will be using.
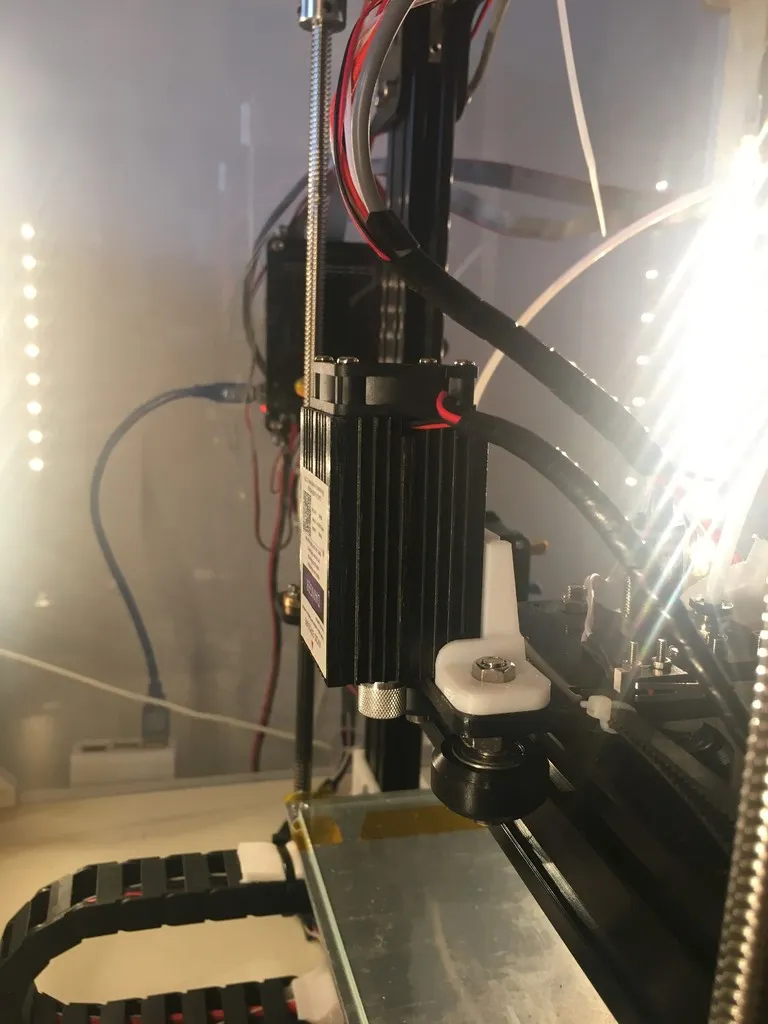
Assembling the Engraver
The assembly of the laser engraver involves attaching the laser module to your Tevo Tarantula. Usually, you remove the 3D printer’s extruder and mount the laser module in its place. The module’s mounting mechanism often involves screws or brackets, and you may need to adjust the position for proper alignment. Be sure the laser’s focus can be easily adjusted to ensure precise engraving. The wiring of the laser module is also essential: you will connect it to the control board of the 3D printer. Ensure each wire is connected to the correct terminal. Consult your laser module’s and printer’s manuals for specific connection instructions.
Connecting to Your Computer

After assembling the laser module, you must connect your Tevo Tarantula to your computer. This connection is necessary for transferring designs and controlling the engraver via the software. Most laser engravers connect to the computer via USB. Once connected, the software should recognize the engraver, as discussed during software setup. Ensure that the correct drivers are installed and that the computer’s operating system detects the device. Test the connection by sending a basic command to the engraver to verify communication. This ensures smooth communication between the software and the laser engraver.
Calibration and Focusing
Calibration and focusing are critical for achieving quality engravings. Calibration involves ensuring the laser module is aligned correctly and the engraving bed is level. This ensures that the laser beam hits the material at the correct angle. Focusing is the process of adjusting the laser’s lens to produce a focused beam on the material’s surface. A focused beam delivers the most power, resulting in clean, precise engravings. Many laser modules have a focus adjustment mechanism; follow the manufacturer’s instructions. The proper focus can also be determined by performing a small test grid on your material.
First Engraving Project
Once your setup is complete, it’s time to start your first engraving project. This is a great way to test your setup and get a feel for the engraving process. Preparing your design, loading it into the software, and adjusting the settings are all vital steps. Start with a simple design and adjust the settings to achieve the desired results. Remember, practice and patience are key to mastering laser engraving. These steps will allow you to personalize items or create custom art that shows your creative skill.
Preparing Your Design

Before engraving, prepare your design using graphics software. Popular software choices include Inkscape (free and open-source), Adobe Illustrator, and CorelDRAW. Ensure your design is in a vector format (e.g., SVG, DXF) as this allows the laser to follow the lines accurately. You can create text, images, or a combination of both. Consider the size and orientation of the design concerning the material you are engraving. Simplify the design if needed to reduce engraving time and improve quality, especially for detailed images. Your design should be optimized for laser engraving to produce the best possible results.
Loading the Design and Adjusting Settings
After creating your design, load it into your laser engraving software. Import the design file and position it on the virtual engraving bed to match the layout on your material. Adjust settings such as power, speed, and passes. The optimal settings depend on the material and the desired outcome. Higher power and slower speed will result in deeper engravings, while lower power and faster speed will create lighter marks. It is best to start with low power and speed and make adjustments based on the test engraving results. Experiment with different settings to achieve the look you want.
Running Your First Engrave
When the design is loaded and the settings are adjusted, you are ready to run your first engrave. Double-check all safety precautions, including wearing your safety glasses and ensuring proper ventilation. Position the material on the engraving bed and carefully secure it. Start the engraving process, and monitor the progress. Pay attention to the laser’s performance and the quality of the engraving. After the engraving is complete, carefully remove the material and inspect the results. Make any necessary adjustments to the settings for future projects based on the outcome.
Troubleshooting Common Issues

Even with careful preparation, you may encounter issues when using your Tevo Tarantula laser engraver. Some problems are common, and knowing how to troubleshoot them can save you time and frustration. Understanding common issues like the laser not firing or producing poor image quality can make the process more manageable and enjoyable. Proper troubleshooting can help you improve your process and achieve the desired results. It is crucial to identify the issue and find the proper steps to fix it.
Engraving Not Working
If the laser is not firing, first, check all electrical connections, including the power supply to the laser module. Ensure the laser module is correctly connected to the control board and that the power switch is on. Check the software settings to ensure the laser is enabled and that the power is set to a non-zero value. Also, verify the firmware configuration, especially if you have recently updated the firmware. Make sure the safety interlocks (if your module has them) are properly engaged. If the problem persists, consult your laser module’s manual or contact the manufacturer for support.
Image Quality Issues
Poor image quality can stem from several factors. The laser’s focus must be correct; adjust the focus to achieve a crisp, clean burn. Low power settings may result in faint engravings. Increase the power settings and/or reduce the engraving speed. Excessive speed can also impact quality; reduce the speed if necessary. The material itself can also affect the image quality, so make sure it is suitable for laser engraving. Vibration in the engraver can also be a cause; ensure all parts of the machine are securely tightened. Finally, check that the design file is clean and free of errors; re-importing and saving the file can sometimes resolve this issue.
Tips for Successful Engraving

Several tips can improve your laser engraving success rate. These tips encompass everything from choosing the correct material to the nuances of laser settings. When starting out, experiment with different materials and settings to build up a reference library. You will quickly gain an understanding of how to best apply these techniques to your work. Also, remember that practice makes perfect. The more you work with your laser engraver, the better you will get.
Material Selection
Choosing the correct material is vital for successful engraving. Consider the material’s properties, such as its density, color, and composition. Softer materials are easier to engrave, but harder materials may yield better results. Wood, acrylic, and leather are all excellent choices for beginners. Perform tests on small pieces of material before engraving a final project. Darker materials tend to absorb more laser energy, so the contrast will be higher. Lighter materials will require a higher laser power to achieve the same results. Always consider the potential for fumes and choose materials that are safe to engrave.
Engraving Settings
Laser engraving settings, including power, speed, and passes, are crucial for quality. Start with lower power and faster speed to avoid burning. Then, gradually increase the power and decrease the speed until the desired result is achieved. The number of passes can also affect the engraving depth; multiple passes may be needed for deeper cuts. Always test the settings on a sample of your material before engraving your final project. Keep a record of the settings that work well for each material to use as a reference in the future. Fine-tuning the settings will greatly improve your overall engraving experience.
Maintaining Your Engraver
Proper maintenance ensures that your laser engraver remains in optimal condition. Regular cleaning, inspection, and upkeep are all key components to keeping your laser engraver in great shape for years to come. Performing proper maintenance will enhance the lifespan of the device and provide consistent, high-quality results. Cleaning your machine regularly will remove debris and dust, which can affect the laser’s performance. Regular maintenance will also improve the safety and the reliability of your machine.
Clean the laser lens regularly with a lens-cleaning solution and a soft cloth to remove any residue. Inspect the moving parts (belts, rails, and bearings) for wear and tear, and lubricate them as needed. Check the alignment of the laser module and make adjustments if necessary. Regularly inspect the wiring for any damage or loose connections. Also, regularly remove any debris from the workspace to reduce the risk of fire. Storing the engraver in a clean, dry environment will also help prolong its life. By following these maintenance tips, you can ensure that your Tevo Tarantula laser engraver provides reliable service for many years.